NOW LOCATED AT 250 CROSSLEY AVE, TRURO, NS
District Office
250 Crossley Avenue, Truro, NS, Canada. B2N7H7
Call Us
+1-902-893-5575
NOW LOCATED AT 250 CROSSLEY AVE, TRURO, NS
250 Crossley Avenue, Truro, NS, Canada. B2N7H7
+1-902-893-5575
Home / Products / Concrete Fasteners
| Part Number | Diameter & Length | Box/Case Quantity |
|---|---|---|
| 295 | 3/16" x 1-1/4" | 100/1000 |
| 297 | 3/16" x 1-3/4" | 100/1000 |
| 300 | 3/16" x 2-1/4" | 100/1000 |
| 301 | 3/16" x 2-3/4" | 100/1000 |
| 303 | 3/16" x 3-1/4" | 100/1000 |
| 305 | 3/16" x 4" | 100/1000 |
| 307 | 1/4" x 1-1/4" | 100/1000 |
| 309 | 1/4" x 1-3/4" | 100/1000 |
| 311 | 1/4" x 2-1/4" | 100/1000 |
| 224 | 1/4" x 2-3/4" | 100/1000 |
| 314 | 1/4" x 3-1/4" | 100/1000 |
| 316 | 1/4" x 4" | 100/1000 |
| 317 | 1/4" x 5" | 100/1000 |
| Part Number | Diameter & Length | Box/Case Quantity |
|---|---|---|
| 296 | 3/16" x 1-1/4" | 100/1000 |
| 298 | 3/16" x 1-3/4" | 100/1000 |
| 299 | 3/16" x 2-1/4" | 100/1000 |
| 302 | 3/16" x 2-3/4" | 100/1000 |
| 304 | 3/16" x 3-1/4" | 100/1000 |
| 306 | 3/16" x 4" | 100/1000 |
| 308 | 1/4" x 1-1/4" | 100/1000 |
| 310 | 1/4" x 1-3/4" | 100/1000 |
| 312 | 1/4" x 2-1/4" | 100/1000 |
| 313 | 1/4" x 2-3/4" | 100/1000 |
| 315 | 1/4" x 3-1/4" | 100/1000 |
| 225 | 1/4" x 4" | 100/1000 |
| 318 | 1/4" x 5" | 100/1000 |

| Part Number | Shank Length | Box Quantity |
|---|---|---|
| - | 16mm / 5/8" K | 100 |
| - | 19mm / 3/4" K | 100 |
| - | 22mm / 7/8" | 100 |
| 516 | 27mm / 1" | 100 |
| - | 32mm / 1-1/4" | 100 |
| 98 | 37mm / 1-1/2" | 100 |
| - | 42mm / 1-5/8" | 100 |
| - | 47mm / 1-7/8" | 100 |
| 294 | 52mm / 2" | 100 |
| - | 57mm / 2-1/4" | 100 |
| 99 | 62mm / 2-1/2" | 100 |
| - | 72mm / 3" | 100 |
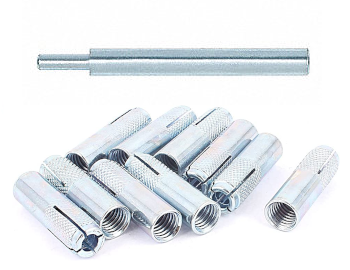
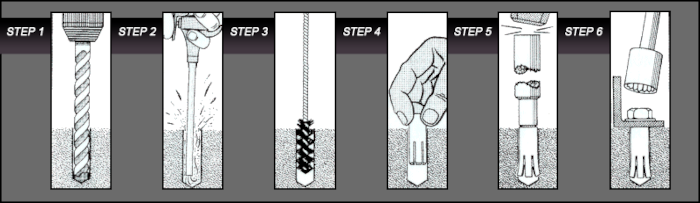
| Part Number | Anchor Size | Hole Size | Setting Tool Size | Box/Case Quantity |
|---|---|---|---|---|
| 158 | 1/4" | 3/8" | 1/4" | 100/1000 |
| 50 | 3/8" | 1/2" | 3/8" | 100/1000 |
| 51 | 1/2" | 5/8" | 1/2" | 50/500 |
| 52 | 5/8" | 7/8" | 5/8" | 25/250 |
| 159 | 3/4" | 1" | 3/4" | 25/250 |
| Part Number | Setting Tool Size |
|---|---|
| 210 | 1/4" |
| 211 | 3/8" |
| 37 | 1/2" |
| 212 | 5/8" |
| 213 | 3/4" |
| Part Number | Anchor Size | Drill Bit Size | Max Fastened Thickness | Pull Out Load (lbs) |
|---|---|---|---|---|
| 198 | 3/16" x 7/8" | 3/16" | 1/4" | 230 |
| 536 | 1/4" x 3/4" | 1/4" | 3/16" | 270 |
| 145 | 1/4" X 1" | 1/4" | 1/4" | 330 |
| 74 | 1/4" X 1-1/4" | 1/4" | 1/2" | 370 |
| 39 | 1/4" X 1-1/2" | 1/4" | 3/4" | 430 |
| 38 | 1/4" X 2" | 1/4" | 1-1/4" | 520 |
| 199 | 1/4" X 2-1/2" | 1/4" | 1-1/4" | 580 |
| 217 | 1/4" x 3" | 1/4" | 1-1/4" | 640 |
| Part Number | Shank Length | Box Quantity |
|---|---|---|
| 156 | 16mm / 5/8" Steel | 100 |
| 358 | 19mm / 3/4" Steel | 100 |
| 357 | 22mm / 7/8" | 100 |
| 248 | 27mm / 1" | 100 |
| 221 | 32mm / 1-1/4" | 100 |
| 65 | 37mm / 1-1/2" | 100 |
| - | 42mm / 1-5/8" | 100 |
| 150 | 47mm / 1-7/8" Steel | 100 |
| 226 | 52mm / 2" | 100 |
| 249 | 57mm / 2-1/4" | 100 |
| 66 | 62mm / 2-1/2" | 100 |
| 147 | 72mm / 3" | 100 |
| Part Number | Shank Length | Box Quantity |
|---|---|---|
| - | 13mm / 1/2" | 100 |
| 197 | 16mm / 5/8" Steel | 100 |
| 2 | 19mm / 3/4" | 100 |
| - | 22mm / 7/8" | 100 |
| 278 | 27mm / 1" | 100 |
| 59 | 32mm / 1-1/4" | 100 |
| 61 | 37mm / 1-1/2" | 100 |
| - | 42mm / 1-5/8" | 100 |
| 220 | 47mm / 1-7/8" Steel | 100 |
| 281 | 52mm / 2" | 100 |
| - | 57mm / 2-1/4" | 100 |
| 60 | 62mm / 2-1/2" | 100 |
| 64 | 72mm / 3" | 100 |
| Part Number | Diameter & Length | Box/Case Quantity |
|---|---|---|
| - | 1/4" x 1-3/8" | 100/1000 |
| - | 1/4" x 2-1/4" | 100/1000 |
| Part Number | Diameter & Length | Box/Case Quantity |
|---|---|---|
| - | 5/16" x 1-1/2" | 100/1000 |
| - | 1/4" x 2" | 100/1000 |
| - | 1/4" x 2" Thresh | 100/1000 |
| - | 1/4" x 3" | 100/1000 |
| - | 1/4" x 4" | 100/1000 |
| - | 3/8" x 2-3/4" | 100/1000 |
| - | 3/8" x 3" | 100/1000 |
| - | 3/8" x 4" | 100/1000 |
| - | 3/8" x 5" | 100/1000 |
| - | 3/8" x 6" | 100/1000 |
| Part Number | Diameter & Length | Box/Case Quantity |
|---|---|---|
| - | 5/16" x 1-1/2" | 100/1000 |
| - | 5/16" x 2-1/2" | 100/1000 |
| 277 | 3/8" x 1-7/8" | 50/500 |
| 577 | 3/8" x 3" | 50/500 |
| 576 | 3/8" x 4" | 50/500 |
| - | 1/2" x 2-1/4" | 25/250 |
| - | 1/2" x 3" | 25/250 |
| - | 1/2" x 4" | 25/250 |
| 375 | 1/2" x 6" | 25/250 |
| - | 5/8" x 2-1/4" | 25/250 |
| - | 5/8" x 3" | 25/250 |
| - | 5/8" x 4-1/4" | 100/100 |
| - | 5/8" x 6" | 100/100 | - | 3/4" x 2-1/2" | 10/100 |
| - | 3/4" x 4-1/4" | 5/50 |
| - | 3/4" x 6-1/4" | 5/50 |
| Part Number | Diameter & Length | Box/Case Quantity |
|---|---|---|
| - | 1/4" x 1-1/4" | 100/1000 |

| Part Number | Diameter & Length | Colour | Power | Power Level |
|---|---|---|---|---|
| 95 | .27 cal (6.8 x 11) | Purple | Strongest | 6 |
| 1 | .27 cal (6.8 x 11) | Red | Strong | 5 |
| 62 | .27 cal (6.8 x 11) | Yellow | Medium | 4 |
| 63 | .27 cal (6.8 x 11) | Green | Low | 3 |
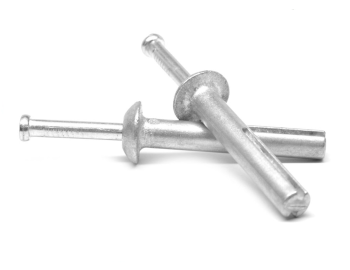
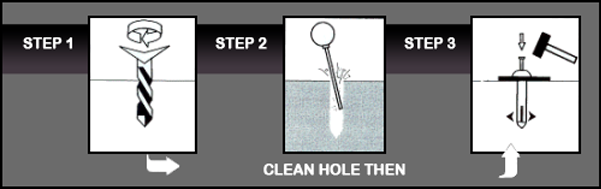
| Part Number | Diameter & Length | Box/Case Quantity | Drill Bit Size | Min. Embedment | Pull Out Load (lbs) | Shear Load (lbs) |
|---|---|---|---|---|---|---|
| 161 | 1/4" x 1-3/4" | 100/1000 | 1/4" | 1-1/8" | 850 | 1000 |
| 54 | 1/4" x 2-1/4" | 100/1000 | 1/4" | 1-1/8" | 850 | 1000 |
| 146 | 1/4" x 3-1/4" | 100/1000 | 1/4" | 1-1/8" | 850 | 1000 |
| 53 | 3/8" x 2-1/4" | 100/500 | 3/8" | 1-1/8" | 1500 | 3200 |
| 55 | 3/8" x 2-3/4" | 100/500 | 3/8" | 1-1/8" | 1500 | 3200 |
| 162 | 3/8" x 3" | 100/500 | 3/8" | 1-1/8" | 1500 | 3200 |
| 49 | 3/8" x 3-3/4" | 100/500 | 3/8" | 1-1/8" | 1500 | 3200 |
| 163 | 3/8" x 5" | 50/300 | 3/8" | 1-1/8" | 1500 | 3200 |
| 200 | 3/8" x 6-1/2" | 50/300 | 3/8" | 1-1/8" | 1500 | 3200 |
| 46 | 1/2" x 2-3/4" | 50/250 | 1/2" | 2-1/4" | 2400 | 5400 |
| 44 | 1/2" x 3-3/4" | 50/250 | 1/2" | 2-1/4" | 2400 | 5400 |
| 36 | 1/2" x 4-1/4" | 25/200 | 1/2" | 2-1/4" | 2400 | 5400 |
| 164 | 1/2" x 5-1/2" | 25/150 | 1/2" | 2-1/4" | 2400 | 5400 |
| 43 | 1/2" x 7" | 25/125 | 1/2" | 2-1/4" | 2400 | 5400 |
| 201 | 1/2" x 8-1/2" | 25/100 | 1/2" | 2-1/4" | 2400 | 5400 |
| 202 | 1/2" x 10" | 25/100 | 1/2" | 2-1/4" | 2400 | 5400 |
| 218 | 1/2" x 12" | 25/100 | 1/2" | 2-1/4" | 2400 | 5400 |
| 47 | 5/8" x 3-1/2" | 25/125 | 5/8" | 2-3/4" | 3400 | 6100 |
| 45 | 5/8" x 4-1/2" | 25/125 | 5/8" | 2-3/4" | 3400 | 6100 |
| 165 | 5/8" x 5" | 25/125 | 5/8" | 2-3/4" | 3400 | 6100 |
| 40 | 5/8" x 6" | 25/100 | 5/8" | 2-3/4" | 3400 | 6100 |
| 41 | 5/8" x 7" | 25/100 | 5/8" | 2-3/4" | 3400 | 6100 |
| 170 | 5/8" x 8-1/2" | 25/100 | 5/8" | 2-3/4" | 3400 | 6100 |
| 203 | 5/8" x 10" | 10/40 | 5/8" | 2-3/4" | 3400 | 6100 |
| 204 | 5/8" x 12" | 10/40 | 5/8" | 2-3/4" | 3400 | 6100 |
| 155 | 3/4" x 4-1/4" | 20/100 | 3/4" | 3-1/4" | 5400 | 9300 |
| 166 | 3/4" x 4-3/4" | 20/80 | 3/4" | 3-1/4" | 5400 | 9300 |
| 167 | 3/4" x 5-1/2" | 20/80 | 3/4" | 3-1/4" | 5400 | 9300 |
| 42 | 3/4" x 6-1/4" | 10/60 | 3/4" | 3-1/4" | 5400 | 9300 |
| 168 | 3/4" x 7" | 10/50 | 3/4" | 3-1/4" | 5400 | 9300 |
| 48 | 3/4" x 8-1/2" | 10/50 | 3/4" | 3-1/4" | 5400 | 9300 |
| 75 | 3/4 x 10" | 10/40 | 3/4" | 3-1/4" | 5400 | 9300 |
| 205 | 3/4" x 12" | 25/100 | 3/4" | 3-1/4" | 5400 | 9300 |
| 206 | 7/8" x 6" | 5/50 | 7/8" | 3-7/8" | 6000 | 13500 |
| 207 | 7/8" x 8" | 5/25 | 7/8" | 3-7/8" | 6000 | 13500 |
| 208 | 7/8" x 10" | 5/20 | 7/8" | 3-7/8" | 6000 | 13500 |
| 171 | 1" x 6" | 5/30 | 1" | 4" | 6500 | 17500 |
| 169 | 1" x 9" | 5/20 | 1" | 4" | 6500 | 17500 |
| 209 | 1" x 12" | 5/20 | 1" | 4" | 6500 | 17500 |